Ball of Sound
A Unity AR game using Vuforia marker tracking and a custom HLSL shader to create a sound-reactive ball that responds to microphone input in augmented reality.
- Unity
- C#
- Vuforia
- HLSL
Downloads and links
Game setup
The game consists of a single Unity scene with several objects.
 Figure 1 - Scene objects
Scene objects
ARCamera — The camera used by Vuforia. It takes the camera image and projects it behind all objects in the scene, replacing the default Unity camera.
ImageTarget — Marker objects with the Vuforia engine. These track physical printed markers. Their world position controls the position of their child objects.
Responder — The ball that responds to sound. It carries a MicrophoneInput.cs script, a spikes material for rendering displaced vertices with custom lighting, and a LightPosition.cs script that feeds the lamp position into the shader.
Lamp — Marks the light source position used in the LightPosition script.
Sensing
Microphone
The main interaction is through the microphone. Volume controls spikiness; pitch controls colour (high pitch = blue, low pitch = red).
The MicrophoneInput script runs these steps every update:
1. Read the microphone source
void MicrophoneIntoAudioSource()
{
    if (Time.time - timeSinceRestart > 0.5f &&
        !Microphone.IsRecording(null))
    {
        src.clip = Microphone.Start(null, true, 300,
                                    AudioSettings.outputSampleRate);
        while (!(Microphone.GetPosition(null) > 0)) { }
        src.Play();
    }
}
Starts the microphone, waits until it has at least one sample, then plays it back into an AudioSource. The audio output is muted — the clip is only used for analysis.
2. Get average loudness
public float GetAverageLoudness()
{
    float[] clipSampleData = new float[sampleDataLength];
    src.clip.GetData(clipSampleData, src.timeSamples);

    float clipLoudness = 0f;
    foreach (var sample in clipSampleData)
        clipLoudness += Mathf.Abs(sample);

    return clipLoudness / sampleDataLength;
}
Samples are in the range -1.0 to 1.0, so absolute values are summed before averaging.
3. Get the most intense pitch
public float GetMostIntensePitch()
{
    float[] clipSampleData = new float[sampleDataLength];
    src.GetSpectrumData(clipSampleData, 0, FFTWindow.Hamming);

    int highest_index = 0;
    for (int i = 0; i < sampleDataLength; ++i)
        if (clipSampleData[i] > clipSampleData[highest_index])
            highest_index = i;

    return highest_index;
}
Uses a 2048-sample FFT (Hamming window) and returns the index of the peak frequency bin.
4. Apply a sigmoid function and scale
float new_vol = (sigmoid(GetAverageLoudness() * 25) - 0.5f) * 2;
float new_pit = (sigmoid(GetMostIntensePitch() / 100) - 0.5f) * 2;
The sigmoid maps any real number to (0, 1). Subtracting 0.5 and multiplying by 2 shifts the output to the range (0, 1) — since the inputs are always positive, the unscaled sigmoid result would cluster near 0.5.
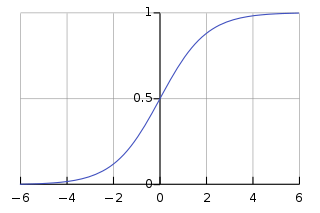 Figure 2 - The logistic curve (source: Wikipedia)
private float sigmoid(float x)
{
    return 1 / (1 + (float)Math.Exp(-x));
}
5. Apply results to the material
spiky.SetFloat("_AudioVolume", new_vol);
spiky.SetFloat("_AudioPitch", new_pit);
Light
The LightPosition script reads the lamp object’s world position each frame and passes it to the shader:
void Update()
{
    Vector4 change = new Vector4(
        lamp.transform.position.x,
        lamp.transform.position.y,
        lamp.transform.position.z,
        0);
    spiky.SetVector("_LightPoint", change);
}
Projecting to reality
Marker-based tracking via Vuforia. Custom markers were created for both objects — a microphone shape for the ball and a lamp shape for the light. Non-organic, non-symmetrical designs give Vuforia the best tracking accuracy.


Figure 3 - Markers used in game
Markers were registered in the Vuforia Target Manager database, downloaded, imported into Unity, and set as the ImageTarget components. The 3D objects are children of their respective ImageTarget objects.
Shader
The spikes shader handles vertex displacement and lighting in a single HLSL pass.
Properties
Properties
{
    _NoiseTex("Noise", 2D) = "white" {}
    _AudioVolume("Volume", float) = 0
    _AudioPitch("Pitch", float) = 0
    _LightPoint("Light Point Position", Vector) = (0,0,0,0)
}
_NoiseTex is a Perlin noise texture — used to get smoothly-varying random numbers across the surface.
Position (vertex shader)
void vert(
    in float4 vertexPos : POSITION,
    ...
    out float4 pos : SV_POSITION)
{
    float4 pixel_location = float4(
        vertexPos.x + (_Time[1] / 5),
        vertexPos.y + (_Time[1] / 5),
        0, 0);
    float random_number = tex2Dlod(_NoiseTex, pixel_location).r
                          * _AudioVolume;
    pos = UnityObjectToClipPos(vertexPos + (random_number * vertexPos));
    ...
}
The texture is sampled at the vertex position offset by time, creating animated movement. The noise value is multiplied by _AudioVolume, then added as a relative offset to the vertex position — louder sound = larger spikes.
Color and light (vertex + fragment)
The vertex shader calculates colour from pitch:
float blue = 0.0 + _AudioPitch;
float red  = 1.0 - _AudioPitch;
col = float4(red, 0, blue, 1);
The fragment shader applies diffuse lighting:
float4 frag(
    in float4 pos          : SV_POSITION,
    in float3 worldNormal  : TEXCOORD1,
    in float3 worldPosition: TEXCOORD2,
    in float4 col          : TEXCOORD0) : COLOR
{
    fixed3 lightDifference = worldPosition - _LightPoint.xyz;
    fixed3 lightDirection  = normalize(lightDifference);
    fixed intensity = -1 * dot(lightDirection, worldNormal);
    col = fixed4(intensity, intensity, intensity, 1) * col;
    return col;
}
The dot product of the normalised light direction and surface normal gives the cosine of the angle between them — this is Lambertian diffuse lighting. The result is negated because when the light shines directly onto the surface the vectors point towards each other (dot product −1), and a brighter surface requires a higher multiplier.
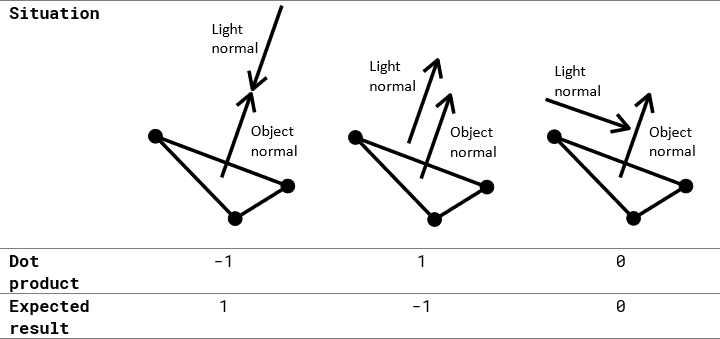 Table 1 - Normal directions and dot product
[1] Vuforia Target Manager